Hello! Welcome to my blog. My name is Em and I work as a cook in rural Minnesota where I live with my hubby. I hope you'll enjoy this assortment of random things I like and mini-adventures I'm living.

Tuesday, September 30, 2014

Before & After

 My sister's college roommates abandoned quite a few things when they moved out this spring, and the adoption of much of those items fell to me! Some just needed a little cleaning, and others became projects of Tender-Loving-Care. The best part was probably that, since these items were free, fear of failure was exceedingly low. It lent a sort of reckless freedom to the whole thing. 

One item was a junky little endtable, complete with faux wood laminate layered over plywood, swollen little spots from water damage, and gum stuck to the underside of the table lip. Yeah, lovely. This is the BEFORE:


My steps of TLC involved:
1. removing the door handles...and the gum
2. a little sanding all over
3. about 3 separate coats of door paint from Menards (with minimum 24 hours between coats to allow drying)
4. reattaching the door handles...

...and voila! The crappy freebie furniture is now "in disguise"! And below are the pics to prove it.

The first coat applied:


And the triumphant AFTER:
 Note with this that although the door paint seemed like a great choice at first, and it dried perfectly smooth on all the vertical sides, the top dried in sort of a crackly-crinkly way. Although unexpected, the crackly paint does give the table a distressed look, which is very in-style right now & which I was happy to keep. It is still a mystery to me how this result occurred.


Some theories are that door paint should be thinned more before this sort of project or perhaps the final coat was too thick. Any other theories are welcome in the comments. 

This is my first experience with choosing and preparing paint, and I certainly didn't realize how many types of paint there are. If you're about to do your first project, take a note from my experience book and do research on your project, appropriate paints, and necessary preparations (primers, sandpaper, paint-thinning, etc). Also look into clean-up, such as using paint thinner to clean your brushes and remove paint from your hands, which I unknowingly needed for cleaning up my oil-based door paint. Thankfully, there just happened to be a can of it laying around and I was saved explaining away the black paint splatters in my in-law's sink.!!

A little side by side comparison - so happy with the finished, "disguised" table!! =) 


Thursday, June 5, 2014

Jammin' Time


Canning is one of those old-time skills I've long wanted to tackle myself. For years I witnessed my mom exercise this skill, filling the basement shelves with colorful jars of green beans, peaches, tomato soup, "stew stuff," and many others. And now this last week I tried it myself for the first time! 

For my canning project, I made jam that doesn't require pectin, and the process in this case doesn't require a pressure canner, either. Turned out to be a good, simple start. Probably something "canning veterans" would smile at and remember as the "kindergarten" of canning!  =]


The recipe (Found at Allrecipes.com): Pectin-Free Strawberry Rhubard Jam

1. Clean 5 cups rhubarb and cut off ends. Cut rhubarb into 1-inch pieces and place in large, heavy cooking pot with 3 cups sugar. Let stand for 2 hours.


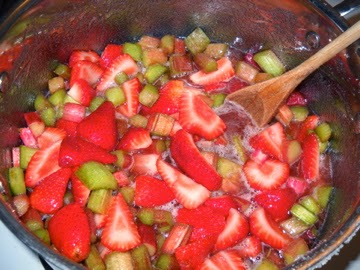
2. Add 5 cups of cleaned, de-stemmed, halved strawberries. Bring to a boil, stirring to dissolve sugar. Then set heat to medium-high and cook jam at full, rolling boil until thickened, about 20-25 minutes. Stir often to keep jam from sticking to bottom. Remove from heat and continue stirring for a few more minutes.


3. Sterilize jars and lids in boiling water for at least 5 minutes. 

My excitement about even the canning equipment can be seen here, by the fact that I took pictures of these fairly everyday items!


4. Pack jam into the sterilized jars, to within a 1/4 inch of the rim. Run a knife inside the filled jars to remove air bubbles and wipe the rims of the jars with a fresh, moist rag to remove any jam. Top with lids and screw-on the rings.


5. The original recipe says to put a rack in the bottom of a large stockpot. I don't have a rack at this time, so I put extra rims in the bottom to keep the jars from touching the bottom of the pot. Fill the pot halfway with water, bring to a boil, and carefully add the jars while using the jar-lifting tongs. Make sure there's at least 2 inches between jars. May need to add more boiling water so the water level is at least 1 inch over the jars. Bring the water to a boil, cover the pot, and process for 10 minutes. 

My jars didn't sit upright (must get a rack for next time!), so I did three at a time, laying sideways in the water. They sealed up just fine. 

6. Remove the jars carefully from the water and place on a cloth, cooling rack, or wood surface. Let stand, several inches apart, for 24 hours while they cool and seal. Once cool, press the lid top with a finger. If it's sealed, it won't move up or down when pressed. If any don't seal, place in fridge.

The Cook's Note at the end was quite helpful to a beginner like me:

  • Properly preserved, jam keeps for up to a year if stored in a cool, dry place. Frozen or refrigerated it will keep even longer. Once opened, consume within 2-3 months.


I'm already looking forward to the next canning adventure, which will probably be in the fall, when my tomatoes, green peppers, and cayenne peppers should be ready! Pasta sauce? Salsa? Who knows what wonders lie ahead. 

Friday, May 23, 2014

Summer's Return

Sun. Sun. Sun. Warmth and warm breezes. Birdsong rampant overhead. Thick, hearty shadows blooming under every tree, vining their way across the lawn at every burst of sun. 

How we have waited.

And now, all this GREEN!!


Tuesday, May 20, 2014

Scratch That: Pizza


Here's a post dedicated to the love of making things from scratch. It's not something I always do, but it's certainly never something I regret! Keep in mind my idea of "from scratch" is not fully from scratch. For that, I think I'd have to grow every conceivable vegetable and herb, own a cow for my dairy source, and learn how to mill wheat into flour. Not exactly things I have time or resources...or knowledge to do. At least at this time! (I say, with much wishful thinking haha). So I'll keep it at mostly homemade while I....   Scratch That: Pizza  

Punnyness most definitely intended.


The Recipe

*Preheat the oven to 350˚F


*For the crust, mix:
2.5 cups flour
2.75 teaspoons baking powder
1 teaspoon salt
Add 1 tablespoon oil and 3/4 cup water and stir until the mixture forms a ball. If dough is stiff, add more water. Dough will be soft, not sticky. Knead on a floured surface for 3-4 minutes. 

*Pour a few tablespoons of oil on your pizza pan. Use the ball of dough to spread it over the whole pan. Turn the ball over so both sides are now oily. It's much easier to handle this way. Use a rolling pin to roll out the dough or just stretch it out with your fingers until it covers the pan, or until crust is the thickness you desire.

*Add toppings. For my pizza, I used:
Meat flavored spaghetti sauce
Lots of pepperoni
Sliced mushrooms
Diced onion
Garlic powder and dried oregano
Shredded Mozzarella and Shredded Italian cheese

*Bake for 10-20 minutes, depending on how hot your oven runs, until cheese is completely melted and crust springs back to the touch. 


*Total prep and cooking time: about 20-30 minutes!!
The crust can also be made in advance and put in a sealed container or bag in the fridge until you're ready to use it.


The Grocery List and Calculator
(Based on amount used for recipe)

Spaghetti sauce (4 oz) 0.30
Pepperoni (2 oz) 0.75
Sliced mushrooms (4 oz) 1.25
Shredded cheese (16 oz) 2.00
Diced onion (3 oz) 0.20
Garlic powder and dried oregano (sprinkling) 0.01 or less
Flour (2 cups) 0.80
Baking Powder (1 t) 0.01 or less
Oil (1 T) 0.01 or less

approximate total cost of 12" pizza: $4.53 (yeahya!!)


The Nutrition Factor

Unfortunately, I didn't record some nutrition things before throwing away containers, like for the pasta sauce. Maybe next time I do a "Scratch That" I'll have some actual stats in this section. For now, I think it's just common sense that anything homemade is going to be more healthful if only because it isn't completely loaded in every possible way with every strange preservative known to man. 


The Resulting Lack of Any Regret

Mmm, mmm, mmm.  =]


Tuesday, May 6, 2014

My Favorite Actors Relocate


Well, hello memories!!


If this post crosses over into the melodramatic, it may be quite fitting, as it deals with a set of characters quite skilled in the art of melodrama: childhood toys. See, as I was decluttering my house and getting rid of all those things I'll never miss anyway, I came across a collection of Barbie things. But not just dolls and piles of clothes and furniture. I came across a collection of characters, story-tellers - actors, if you will.


As I removed them from their storage, I could feel the old stories rushing back at me. The daring escapes, the horrible betrayals they experienced as good fought with evil. Barbie rescuing Ken from a cliff, Ken returning the favor by throwing himself in front of a bear to save Barbie. Children packing their lives in the car and running away from the orphanage. Covered wagons and amazonian women swinging on vines and committing Robin-Hood-like feats and heists. Reenacting scenes from movies. Travels to far away lands and distant histories. Soap operas and sit-coms in our hands.


Amazing how these toys are never really things to us. How they are vehicles for our stories. How they were vehicles for our stories. And amazing how even as children we grasp the basics of story.

Christina
I warned you this would get melodramatic. But I'll stop myself and introduce what remains of a once large community of "actors" living in my home and being recalled straight from my childhood. 

There's Christina, who's actually a look-alike and namesake of a doll I had before. She was always typecast as a savvy leader and independent woman. She's played the leader of a band of homeless women, cynical and protective. She's been the working entrepreneur mom with a Househusband, complete with apron, making her pancakes for breakfast on bright pink plates. Her most memorable role to me is singing "Starlight, Starbright" every time there was a talent show. That, and how she'd reveal her shockingly short hair by accident and end up telling the story of a painful past and a horrible disease and all the trial she had endured. And then whoever listened, Ken or Barbie or some younger doll, would be inspired by her personal strength. And a friendship would be forged out of sheer admiration and respect. 

Amy
Then there's Amy, whose roles have included sit-com college student, businesswoman, and pioneer. She was often that unfortunate character who the misogynistic Ken character would hit on first because her physicality fits the apparent stereotype of "bubbly blondes are easy." But her personality and strength defied that in every way, as she always ended up roundhouse kicking Ken to the floor when he wouldn't take no for an answer. And if that doesn't make her enough of a baddass, there's always the nail-polish tattoo on her right bicep. She may be most memorable as rebellious handmaiden to the Ancient Greek Empress in a story involving a diving rivalry between the royal houses of Spain and Greece (apparently in some alternate reality). 


Bobby

And Bobby! Who could forget little Bobby, with that mischievous look on his face. Little brown eyes looking innocently up as if to say, "it wasn't me, I swear." He was always getting into a mess or wandering off and his poor frazzled parents would tear out their plastic hair in agony, wondering what drawer, closet, or cupboard has he hidden himself in this time?


Chris
And then there's Chris. Oh, Prince Charming. How fun it was to play up his cheesiness. And all of the stereotypical stories that involve some cheesy, over-smiling male with a dry-toast personality trying to woo...anyone. But we didn't always let him be that way. Sometimes he was a good guy. Especially in a certain soap opera we created. In that soap opera, he was the boyfriend of a doll with a terminal illness. And also played the fiance to a doll with a super eccentric mother who was constantly baking things and consistently burning them to a crisp in the Barbie oven. He would grimace in anguish whenever the smoke alarm interrupted some romantic speech to his beloved. Of course, the grimace was all in our minds. Cuz...yeah...that smile never ceases. Did I mention he was always a prime candidate for playing the funny guy? He kinda has that look like, "I just told the punniest joke. Ever."


Paige

And little Paige. She's been around a looooong time, some 14 years or so. No wonder she'd end up playing this oh-so-wise toddler, whose monk-like remarks always guided her elders. While the adults were all running around looking for Bobby, she would shake her head and sigh at the futility of their exasperation. If only they would ask her! She knew all that passed in the household, and in all the universe for that matter, apparently. 

"Ohm," she might say, as she meditates on "the sound of one hand clapping." 

It's also hard to forget her part as the daughter of Ariel the mermaid, who was tricked into marrying a Raj of India and later learned he was just the guy from next door whose overstocked pantry was always being depleted by Ariel and her accomplices as they stole from the rich and gave to the poor. 
Eliza


Eliza is one of my favorites ever. In the sit-com family comedy, she played this über athletic tough gal and her brother played this guy who read American-Girl magazines and secretly made paper-and-glue hand crafted items. I suppose we were exploring the swapping of the gender roles that are so easy to notice if you watch even an hour of kid's Saturday morning TV. She's always been this tough little gal, a tomboy typecast almost every time, and another doll who loved to swing on vines and commit feats of daring like the women before her.

The Bags Are Packed

Suppose it's time to box them up again and take them to Goodwill. Hope some kids take them home for a very cheap price and have their own adventures with these characters, telling their own stories of daring-do. As actors, they've had a pretty good run and experienced a whole range of characters and plots. But who's to say they can't go on to wow another audience with their social commentary and versatility? That's what I'm hoping for them. =]


My favorite actors hit the road to some new venue


Thursday, March 13, 2014

A New Addition

Here's Giovanni, my new roommate. Just adopted him from some friends who found he didn't get along with their other fish, which is no surprise since he's a Betta. He's not even been here a week but I've already learned so much about what Bettas need.


First, I learned the ideal tank size for a single Betta is 5 gallons, but they can live in less, 2 gallons being a minimum (based on information in forums). A friend of mine in college had one in a tiny bowl with a plant growing in it. Turns out that is a huge NO for Betta fish, who need much more water, access to surface air for their Labyrinth organ, and who'll only eat plants if they are starving to death.

What I got for Giovanni is this 3-gallon tank, which came in a kit including LED light, aquarium air pump, undergravel filter, and starter packs of food and water purifier. I also bought a pack of fake plants and a bag of aquarium gravel. There was a sort of spiky plant in there, too, but I learned those can hurt the Betta's delicate and sensitive fins, so I removed it. The large rocks in the tank are some I collected on a trip to Lake Superior. Now that I think of it, Lake Superior is the complete opposite of a tropical Betta's world!


And that reminds me of the next thing I learned - room temperature is not warm enough for the Betta. At least not in Minnesotan winter, anyway. My house is maybe 65 degrees, and Bettas prefer 76-82, so that was clearly a problem and was making Giovanni sluggish. So I got a thermometer and a submersible tank heater, and within a day, Lil G was up and exploring his new home with much more zest. It was a relief to find the problem was just the temperature and not something else! Also, on a side note, it was a good surprise that the suction cups on the thermometer and heater work so well. Suction cups in my experience are never trustworthy. But these are an exception.


Another thing about Bettas is that they are lovers of slow-moving water. Too much current in the tank is bad. The filter that came with my tank created too much current, so I cut out two layers of nylon from some old pantyhose and placed them between the fish guard and rise tube. I cut a hole in the center of the nylon pieces to allow the air tube to still pass through. This made for a much more gentle current.


Here is the water purifier that came with my kit (pictured right). The food included was unfortunately flake food, which Bettas apparently can have but mine will not eat. So I bought TetraBetta mini pellets (pictured left). They're small enough for his tiny mouth, not to mention he actually eats them rather than staring indignantly at them like he did with the flake food. =]


I'm sure I still have much more to learn about caring for my home's new addition! And I'm looking forward to it. Glad the little guy is settling in well.

Though he does seem to be a little camera shy?

Wednesday, March 12, 2014

Cuttings of Irish Moss

My grandma's kitchen window always had little jars and pots with delicate green vines overflowing from them. The bright green stems would reach toward the western sunlight on the other side of the glass. Metal butterflies bejeweled with colored glass would appear to hover in the lush mini-forest in the window sill above the sink. It was something that captured my imagination and wonder as a kid, and made me first fall in love with what I now know to be Baby's Tears (aka Irish Moss, Corsican Carpet, etc). A couple years ago, my mom bought me a plant and since then I've been doing cuttings and transplanting to new pots. The picture on the right started as about four cuttings of Baby's Tears stems, and has since taken over the planter.  

It's pretty simple:

1) Take three or so small cuttings from your existing plant (my mom bought my original plant online).


2) Place the cuttings in a glass of water, making sure that the cut end is submerged. Leave them to soak for about a day. 


3) Choose a planter, pot, jar, old coffee mug, whatever you like. Fill it with potting soil (I had leftover garden soil from my urban pail garden, so I used that instead). Add water until the soil is completely saturated. 

4) After the cuttings are done soaking, push the cut ends into the saturated soil and gently press soil around the base of each cutting. Keep the soil moist and be patient. =] After a couple days, the cuttings will stop being limp and will be growing toward the light. They also spring back a bit when touched. 


 5) The little plants like bright to filtered light and very moist soil. They do well at room temperature and cooler. By my window this winter it's probably about 60 degrees, and they're doing happily!

One thing I have yet to learn is how to "pinch" them so they grow in a mounded shape and cover the soil more thickly. That and finding some wire-and-glass butterflies to inhabit these plants. May be my next project.!