
Canning is one of those old-time skills I've long wanted to tackle myself. For years I witnessed my mom exercise this skill, filling the basement shelves with colorful jars of green beans, peaches, tomato soup, "stew stuff," and many others. And now this last week I tried it myself for the first time!
For my canning project, I made jam that doesn't require pectin, and the process in this case doesn't require a pressure canner, either. Turned out to be a good, simple start. Probably something "canning veterans" would smile at and remember as the "kindergarten" of canning! =]
The recipe (Found at Allrecipes.com): Pectin-Free Strawberry Rhubard Jam
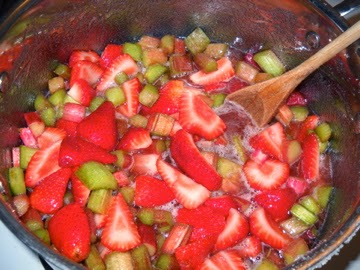
1. Clean 5 cups rhubarb and cut off ends. Cut rhubarb into 1-inch pieces and place in large, heavy cooking pot with 3 cups sugar. Let stand for 2 hours.

2. Add 5 cups of cleaned, de-stemmed, halved strawberries. Bring to a boil, stirring to dissolve sugar. Then set heat to medium-high and cook jam at full, rolling boil until thickened, about 20-25 minutes. Stir often to keep jam from sticking to bottom. Remove from heat and continue stirring for a few more minutes.

3. Sterilize jars and lids in boiling water for at least 5 minutes.
My excitement about even the canning equipment can be seen here, by the fact that I took pictures of these fairly everyday items!


4. Pack jam into the sterilized jars, to within a 1/4 inch of the rim. Run a knife inside the filled jars to remove air bubbles and wipe the rims of the jars with a fresh, moist rag to remove any jam. Top with lids and screw-on the rings.

5. The original recipe says to put a rack in the bottom of a large stockpot. I don't have a rack at this time, so I put extra rims in the bottom to keep the jars from touching the bottom of the pot. Fill the pot halfway with water, bring to a boil, and carefully add the jars while using the jar-lifting tongs. Make sure there's at least 2 inches between jars. May need to add more boiling water so the water level is at least 1 inch over the jars. Bring the water to a boil, cover the pot, and process for 10 minutes.
My jars didn't sit upright (must get a rack for next time!), so I did three at a time, laying sideways in the water. They sealed up just fine.
6. Remove the jars carefully from the water and place on a cloth, cooling rack, or wood surface. Let stand, several inches apart, for 24 hours while they cool and seal. Once cool, press the lid top with a finger. If it's sealed, it won't move up or down when pressed. If any don't seal, place in fridge.
The Cook's Note at the end was quite helpful to a beginner like me:

I'm already looking forward to the next canning adventure, which will probably be in the fall, when my tomatoes, green peppers, and cayenne peppers should be ready! Pasta sauce? Salsa? Who knows what wonders lie ahead.